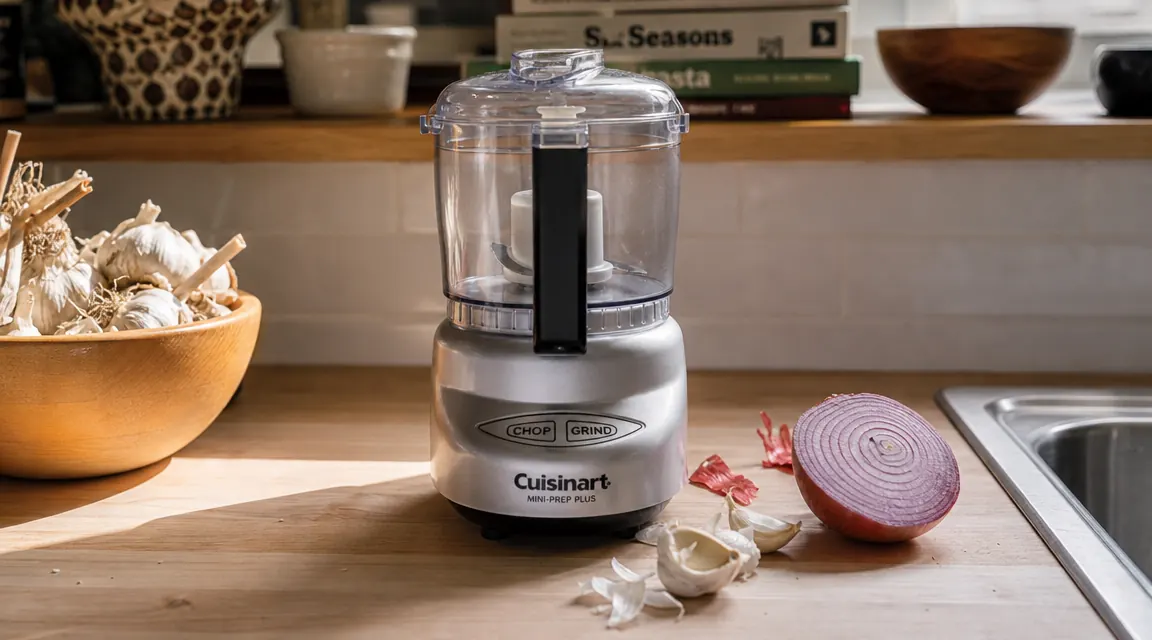
Meal prep in a small kitchen has one persistent enemy: chopping. Not because it is hard, but because it is slow, repetitive, and eats counter space when you spread out the cutting board, the garlic press, the herb scissors, and the three separate piles of aromatics you need for Wednesday's batch of soup. I cooked in a 90-square-foot galley kitchen for two years, and the tool that finally compressed that whole setup was a 3-cup mini food processor the size of a large coffee mug.
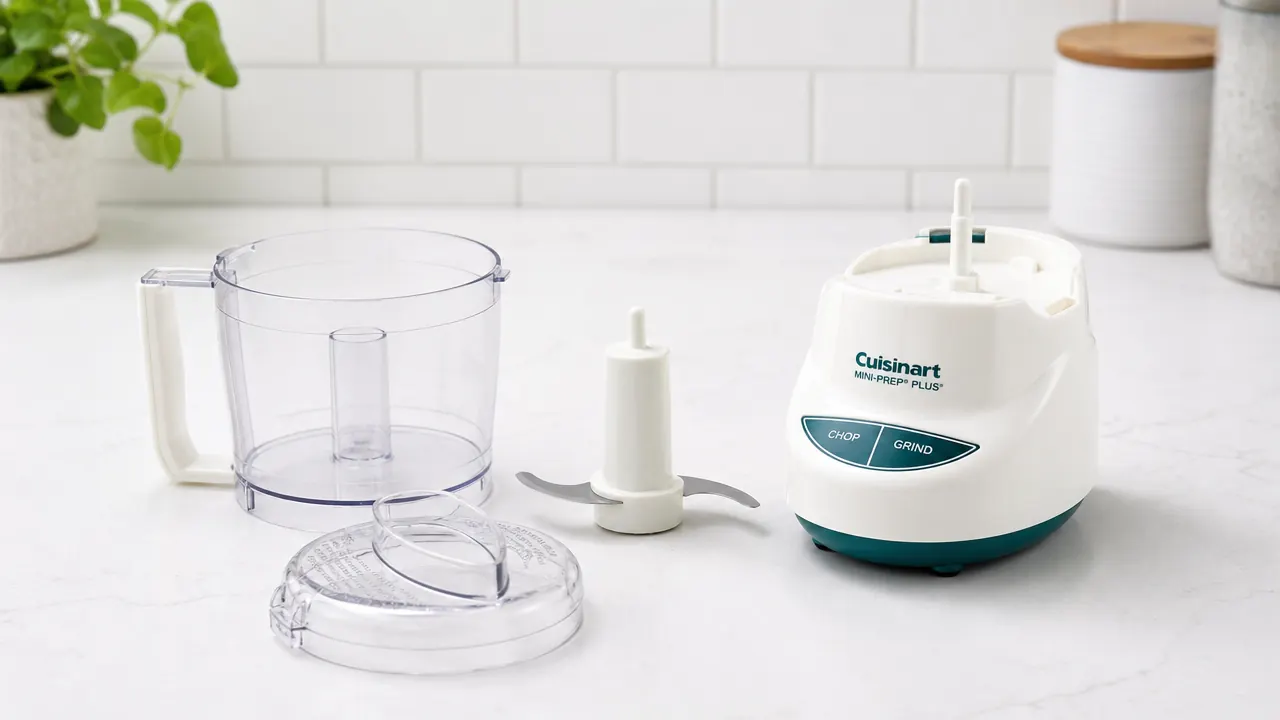
The Cuisinart Mini-Prep Plus (ASIN B0000645YM) is a 4.6-star product with nearly 20,000 reviews, and it earns that rating for one specific reason: it handles the five or six chopping and mincing tasks that show up in almost every weeknight recipe without taking up meaningful counter space. This guide walks you through exactly how to use it for each of those tasks, what settings to use, how much to load, and how to clean it in under two minutes so it does not become another counter appliance that gets pushed to the back of the cabinet.
Stop spending 20 minutes on onions every Sunday. The Cuisinart Mini-Prep Plus handles the whole batch in under 60 seconds.
Rated 4.6 stars across nearly 20,000 Amazon reviews. Under $50, 7 inches tall, and stores in a cabinet drawer when not in use.
Amazon Check Today's Price on Amazon →Step 1: Know Your Two Modes and When to Use Each
The Cuisinart Mini-Prep Plus has two processing modes: Chop and Puree. This is not a toggle for coarse versus fine results only. The blade actually reverses direction between modes, which changes how the sharp edge contacts food. In Chop mode, the flat back edge of the reversible blade leads and pushes through food, giving you controlled dicing. In Puree mode, the sharpened edge leads for a smoother, more continuous cut. Getting this wrong is the main reason people complain about uneven results.
The rule is simple: use Chop for anything you want diced or minced but still textured (onions, garlic, peppers, hard herbs like rosemary). Use Puree for anything you want smooth or sauce-like (canned tomatoes, cooked beans, hummus bases, pesto, fresh herb sauces). When in doubt, start with Chop. You can always switch to Puree if you want it finer, but you cannot un-puree an onion.
Step 2: Prep Your Vegetables for the Bowl, Not the Cutting Board
The 3-cup bowl is not big, so your pre-cut sizing matters. For hard vegetables like onions, halve them before dropping them in. A full medium onion fills the bowl in about three pieces. Garlic cloves go in whole, no peeling beyond removing the papery skin. Bell peppers should be cut into rough 1-inch chunks. Carrots work best quartered lengthwise then cut into 2-inch segments. The goal is pieces small enough that nothing is wedged against the bowl wall on the first pulse.
For herbs, rinse and dry them before processing. Wet herbs clump against the bowl wall and resist the blade. A salad spinner or patting with a kitchen towel takes 30 seconds and makes a real difference. Parsley, cilantro, and basil can all go in stems and leaves together for sauces. For dry herb blends, strip the leaves and discard the woody stems first.
One thing to avoid: overfilling. The bowl holds 3 cups, but for chopping you want to fill it no more than halfway for the first round. Overloaded bowls give you uneven results where the food on the bottom is over-processed and the food at the top is still in large pieces. If you have a full onion's worth to chop, do it in two batches. Each batch takes about 8 seconds of pulsing. The total time is still under a minute.
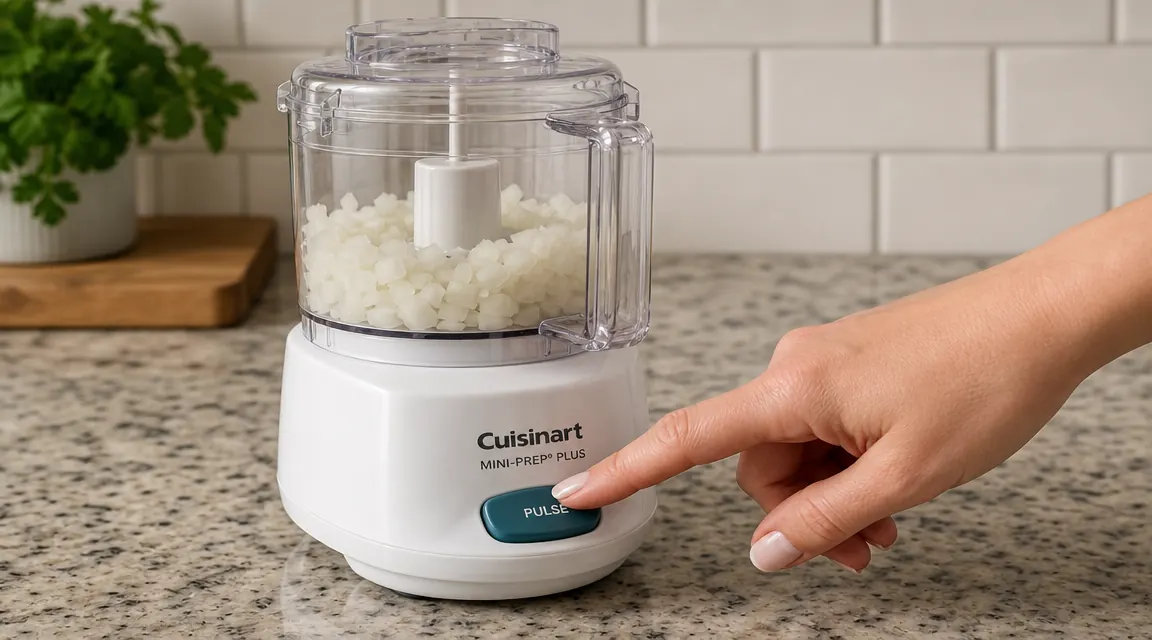
Step 3: Use Pulse for Chopping, Not Continuous Run
Continuous run is for pureeing. For chopping and mincing, pulse is the control tool. A pulse is a burst of about half a second. Three to five pulses gives you a rough chop suitable for soup or stew. Eight to ten pulses gets you a medium dice. Fifteen pulses gets you a fine mince that works for aromatics in sauces. Pulses let you check progress instead of opening the lid on a fully pureed onion you wanted diced.
If pieces are flying to the sides and not getting hit by the blade, stop and scrape down the bowl walls with a small spatula. This happens most often with herbs and moist vegetables. A scrape-and-pulse cycle every few rounds keeps everything processing evenly. The lid comes off with a simple twist, so checking takes three seconds.
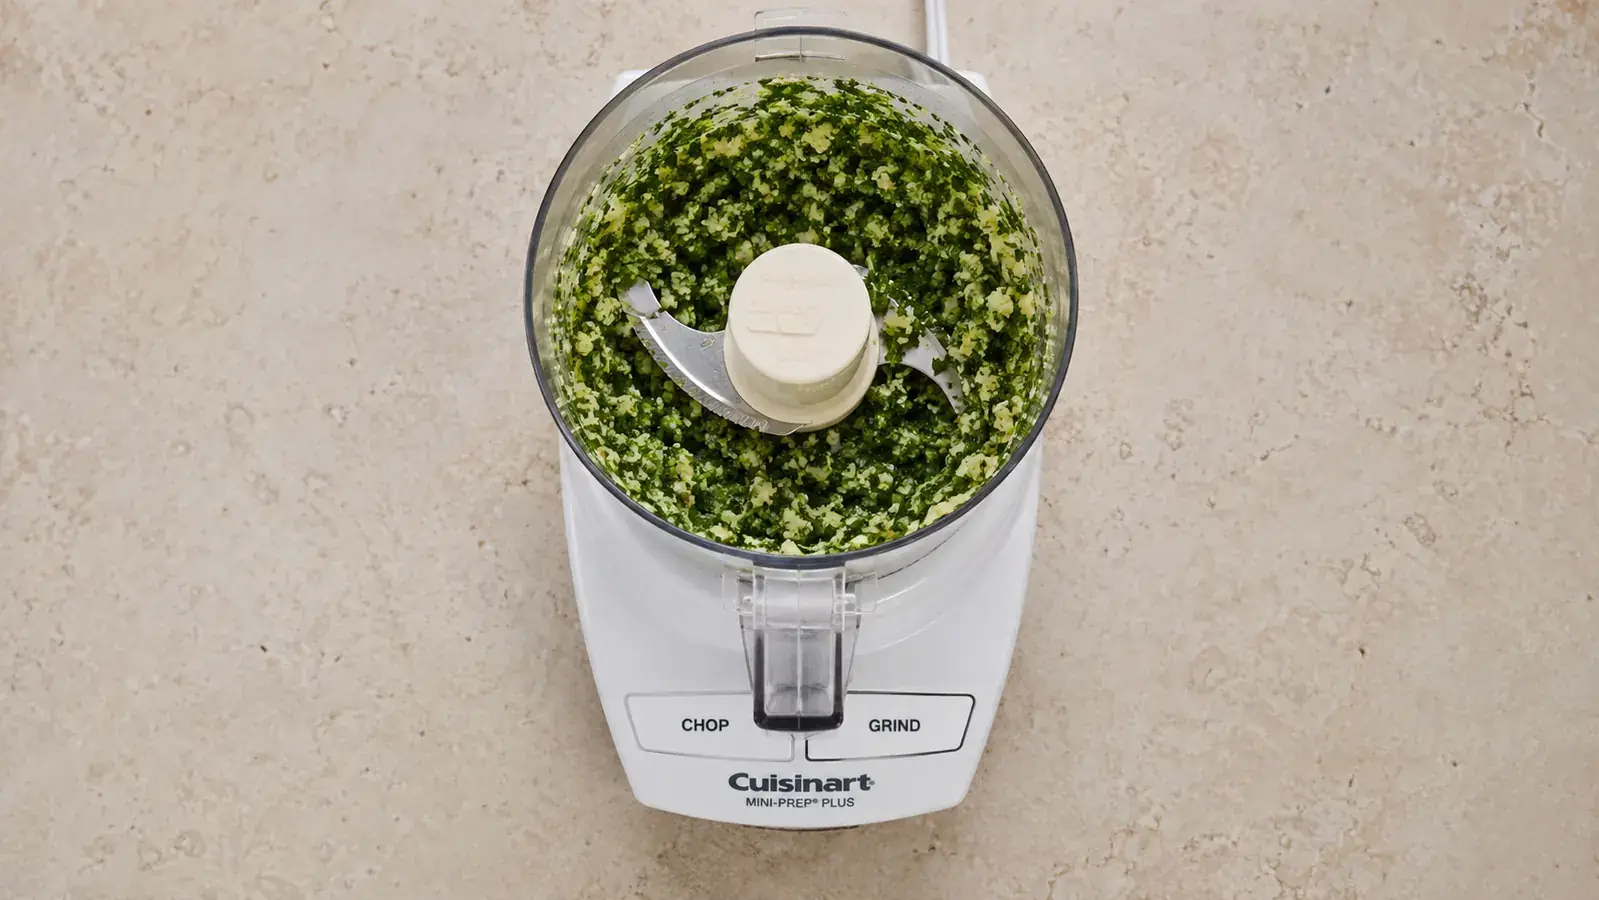
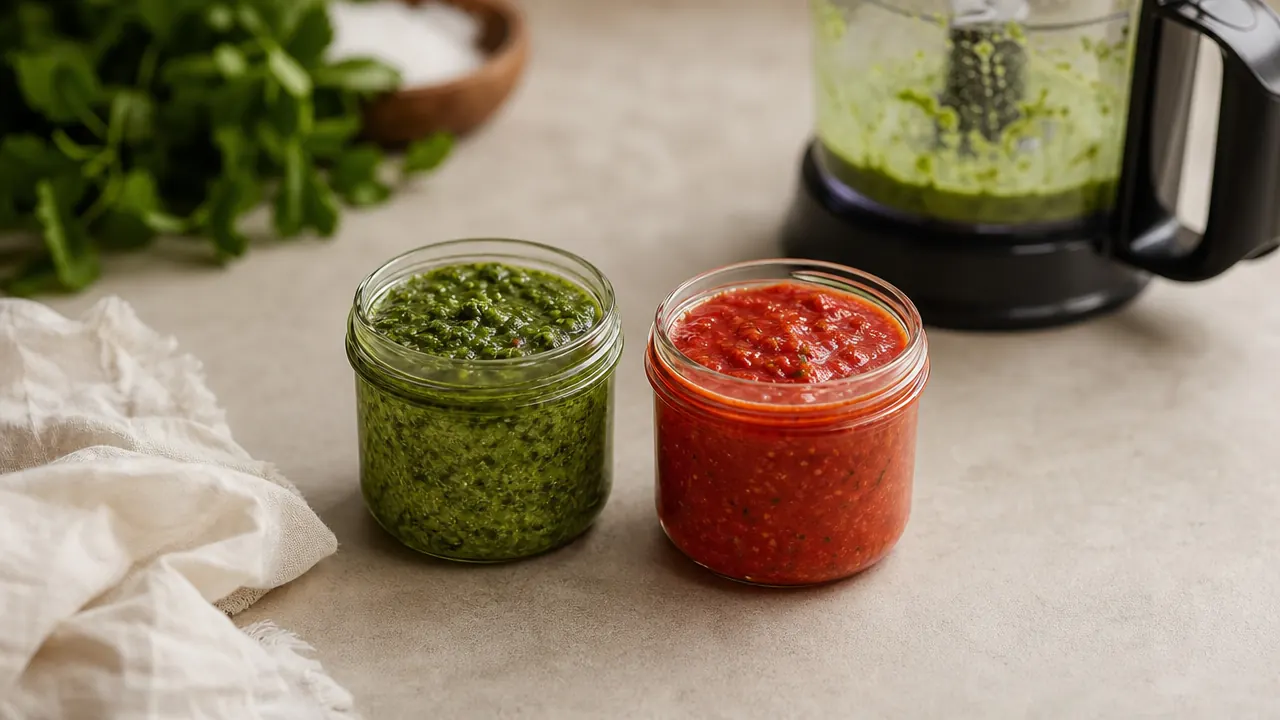
Step 4: Make Herb Sauces and Pastes in the Same Bowl
Herb sauces, chimichurri, pestos, and gremolata are where the Mini-Prep Plus earns its counter space beyond just chopping. Add fresh herbs, a clove of garlic, a pinch of salt, and a tablespoon of olive oil to the bowl. Switch to Puree mode. Run for 20 to 30 seconds, stopping once to scrape the walls, and you have a smooth sauce. The 3-cup capacity is exactly right for a single batch of herb sauce for two people, which means zero waste.
For a basic parsley sauce that works on grilled chicken, pasta, or roasted vegetables: add 1 packed cup of fresh parsley leaves, 1 garlic clove, juice of half a lemon, a pinch of red pepper flakes, and 3 tablespoons of olive oil. Puree mode for 20 seconds. Taste, adjust salt. That whole sequence takes under 4 minutes including pulling the parsley off the stems. A restaurant would charge $4 for that sauce as a side.
Step 5: Handle Garlic, Ginger, and Small Aromatics Efficiently
This is where small food processors save the most time per meal. Garlic and ginger are slow by hand because of their size and stickiness, and a garlic press only handles one clove at a time. With the Mini-Prep Plus, add 6 to 8 peeled garlic cloves to the bowl, press Chop, and pulse 8 to 10 times for minced garlic. For a whole head of garlic, separate and peel the cloves first. Processing takes about 10 seconds. The minced garlic stores in a small jar in the fridge for up to a week.
Ginger works the same way. Peel a 2-inch knob, cut it into rough chunks, and pulse in Chop mode for 6 to 8 pulses. You get finely minced ginger with no hand cramps from gripping a fine-tooth grater. For recipes that call for a garlic-ginger paste, add both to the bowl at the same time, add a teaspoon of neutral oil, and puree for 15 seconds. This paste freezes well in ice cube trays for single-serving portions.
Six cloves of garlic, ten pulses, twelve seconds. That is the entire math problem. The Mini-Prep Plus does in a few seconds what a knife and cutting board takes four minutes to accomplish.
What Else Helps
A few habits make the Mini-Prep Plus significantly more useful in a small kitchen. First, process aromatics in batches at the start of your prep session, not ingredient by ingredient as you cook. Mince all your garlic for the week in one go on Sunday. Chop the onions for the next three dinners. Store in small lidded containers in the fridge and your actual cooking time drops by ten minutes per meal.
Second, do not rinse the bowl between tasks during a single prep session unless you are switching from savory to sweet. Garlic residue in the bowl before you chop onions for the same dish does not matter. You are chopping them for the same pot anyway. Saving that rinse step means the machine stays on the counter and in use rather than going to the sink and breaking your momentum.
Third, use the lid as a cutting surface for herbs. The flat plastic top is smooth and easy to wipe. Stripping parsley leaves onto the lid before dropping them into the bowl cuts out one trip to the cutting board. Small habit, but in a tiny kitchen where every surface counts, it matters. For more on what this processor can handle day to day, read the long-term review: Cuisinart Mini-Prep Plus Review: Six Months of Weekly Meal Prep.
Cleaning in Under Two Minutes
The bowl and lid of the Mini-Prep Plus are top-rack dishwasher safe, but in a small kitchen you likely run the dishwasher only once a day at most. For a quick hand-wash between uses: remove the blade carefully by gripping the center post (not the edge), rinse the blade under running water, drop it blade-side down into a cup while the bowl soaks. Add a small drop of dish soap to the bowl, fill it one-third with warm water, put the lid back on, and pulse once in Chop mode. The soapy water scrubs the bowl walls from the inside. Dump it, rinse, done.
The motor base wipes clean with a damp cloth. Never submerge it. The rubber feet grip the counter so you do not need to hold it during processing. Footprint on your counter: roughly 6.5 inches wide by 7.5 inches deep. It tucks into a deep cabinet drawer when not in use, which is where it lives at my place between Sunday prep sessions. If you want the full picture on where it earns its keep and where it falls short, the honest review covers both: Cuisinart Mini-Prep Plus Honest Review: What the 3-Cup Food Processor Does Well and Where It Falls Short.
When the Mini Food Processor Is Not the Right Tool
Be honest with yourself about what a 3-cup machine cannot do. It will not slice vegetables into thin rounds, so a mandoline or a knife still handles cucumbers and radishes for salads. It cannot julienne. It struggles with very dry, crumbly ingredients like hard cheese in big blocks because they bounce around the bowl rather than getting caught by the blade. For large batch cooking where you need to chop five pounds of onions, the 3-cup bowl requires too many refill rounds and a full-size food processor becomes the right call. This machine is optimized for 2-to-4 serving portions, which matches exactly how most people in small apartments actually cook.
It also should not be your only appliance if you want to make nut butters, grind dry spices, or emulsify a mayonnaise. Those tasks need either a high-powered blender or a dedicated spice grinder. But for the five tasks that account for 80 percent of weeknight prep time, meaning onions, garlic, herbs, peppers, and quick sauces, this machine handles all of them in less time than it takes to find your garlic press in the back of the drawer.
Ready to get through Sunday prep in 30 minutes instead of an hour? The Cuisinart Mini-Prep Plus fits in a drawer and processes in seconds.
4.6 stars, nearly 20,000 reviews, and under $50 at current Amazon pricing. Reversible blade, two modes, dishwasher-safe bowl and lid.
Amazon Check Today's Price on Amazon →